
Had one of the funniest/most rewarding geeky evenings last night figuring out how to automate my Tempurpedic Ergo Adjustable electric bed with my good ole automation buddy Andrew. Since getting this whole Quadomated home automation stuff together one of my biggest wish list items was to get my electric bed integrated into the system so that I could control it with my cell phone and voice.
I started thinking about automating my electric bed way back before the house was built, and even prewired a bunch of 18 gauge wires from my media room to the bed, but didn’t really start digging into things until a few weeks ago. I knew it could be automated with the loud clicks of the relays that fired the linear actuators, it was just figuring out how to hack into the circuitry and jumper in the appropriate voltage at the right place that was the challenge. We could open up the main controller and start poking around there, but I was scared to heck of screwing up and voiding the warranty of my very expensive electric bed. It wasn’t until we started taking apart the wireless controller that the solution instantly became obvious.
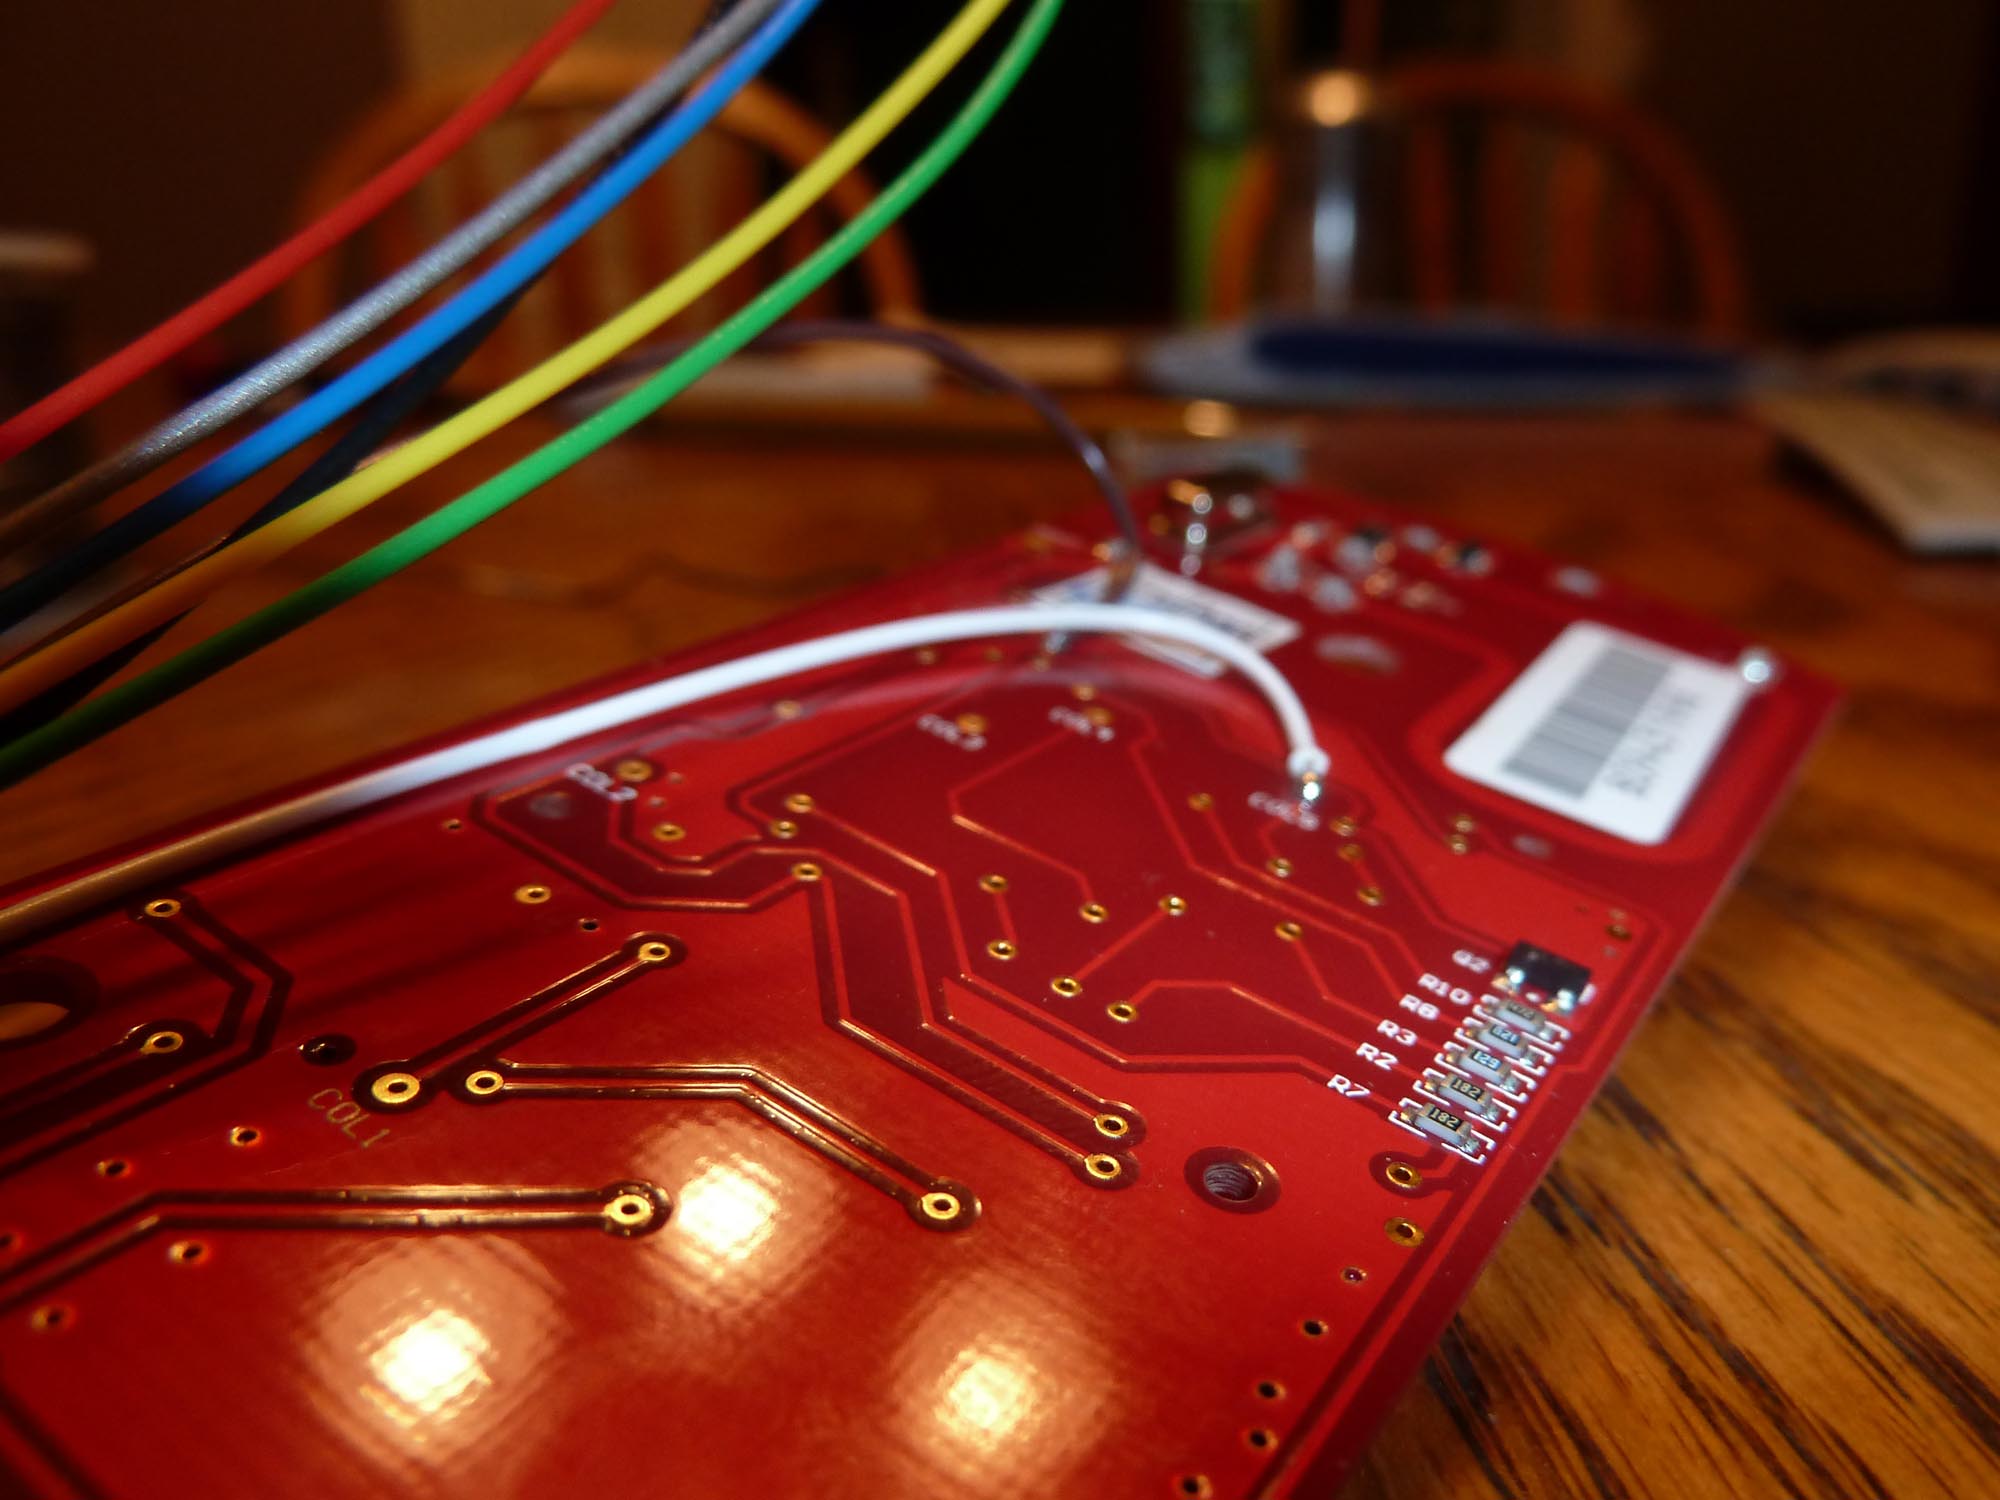
This is what we saw when we took off the front cover of the wireless controller:

Tempurpedic Ergo Adjustable Bed Automation – Taking the Wireless Controller Part
Notice the copper traces that are underneath each button. If you look closely enough, you’ll see that each copper trace is actually two separate copper paths that are narrowly separated by the red PCB board. When the corresponding button is pushed down the black piece of conductive material underneath the button completes the circuit and sends the corresponding wireless single to bed.
If you look even closer you’ll notice each of these conductive paths goes to a nearby solderable hole. We started messing around with jumpering these solderable holes and quickly realized that we could operate each button of the bed by finding the appropriate holes and jumpering them together like shown in the picture below.

Tempurpedic Ergo Adjustable Bed Automation – Jumpering a Button to Make It Work
Now that we knew how the wireless control worked we started mapping out the terminals to the functions I wanted. We wanted to keep the wireless remote control so that it was still operable and modular, so I limited myself to only the functions that would fit on a standard 8 conductor RJ45 ended cable. After testing a number of different combinations we found that we could control 7 buttons with the 8 conductors. The buttons I chose are: head up/down, foot up/down, bed flat, memory 4, massage 2, and massage stop.
The wire mapping and terminals turned out as below:

Tempurpedic Ergo Adjustable Bed Automation – Tracing out The Terminals We Needed
We then got to work stripping the outer insulation of a flat 8 conductor 26 gauge telephone wire.

Tempurpedic Ergo Adjustable Bed Automation – The 8 Conductor Cable
Once in place, the wire would extend out approximately 1 inch from the wireless remote control.

Tempurpedic Ergo Adjustable Bed Automation – The Wireless Remote and the Cable Mocked in the Place
The next step was to superglue the telephone wire to the PCB board so that it would stay in place while we made the connections. We decided to start with one button to prove that it would work, and soldered the white and black wires to the appropriate solderable holes.

Tempurpedic Ergo Adjustable Bed Automation – Soldering up the First Button
A closer view of the board, solderable holes, and connections.
Tempurpedic Ergo Adjustable Bed Automation – A Closer View of the Board, Solderable Holes, and Connections
Last step of the night was to prove that our little “button hack” would really interface into my control system. Here you see the white/black wires connected into the NORMALLY OPEN and COMMON terminals of a relay. Using the HAI PC Access software I fired output 5, and presto my bed started sitting up! Below, notice the red light above the relay showing that it’s activated, and the blue lights on the electric bed remote control showing it’s lit up, and the red light at the bottom meaning its sending a wireless signal to my bed.
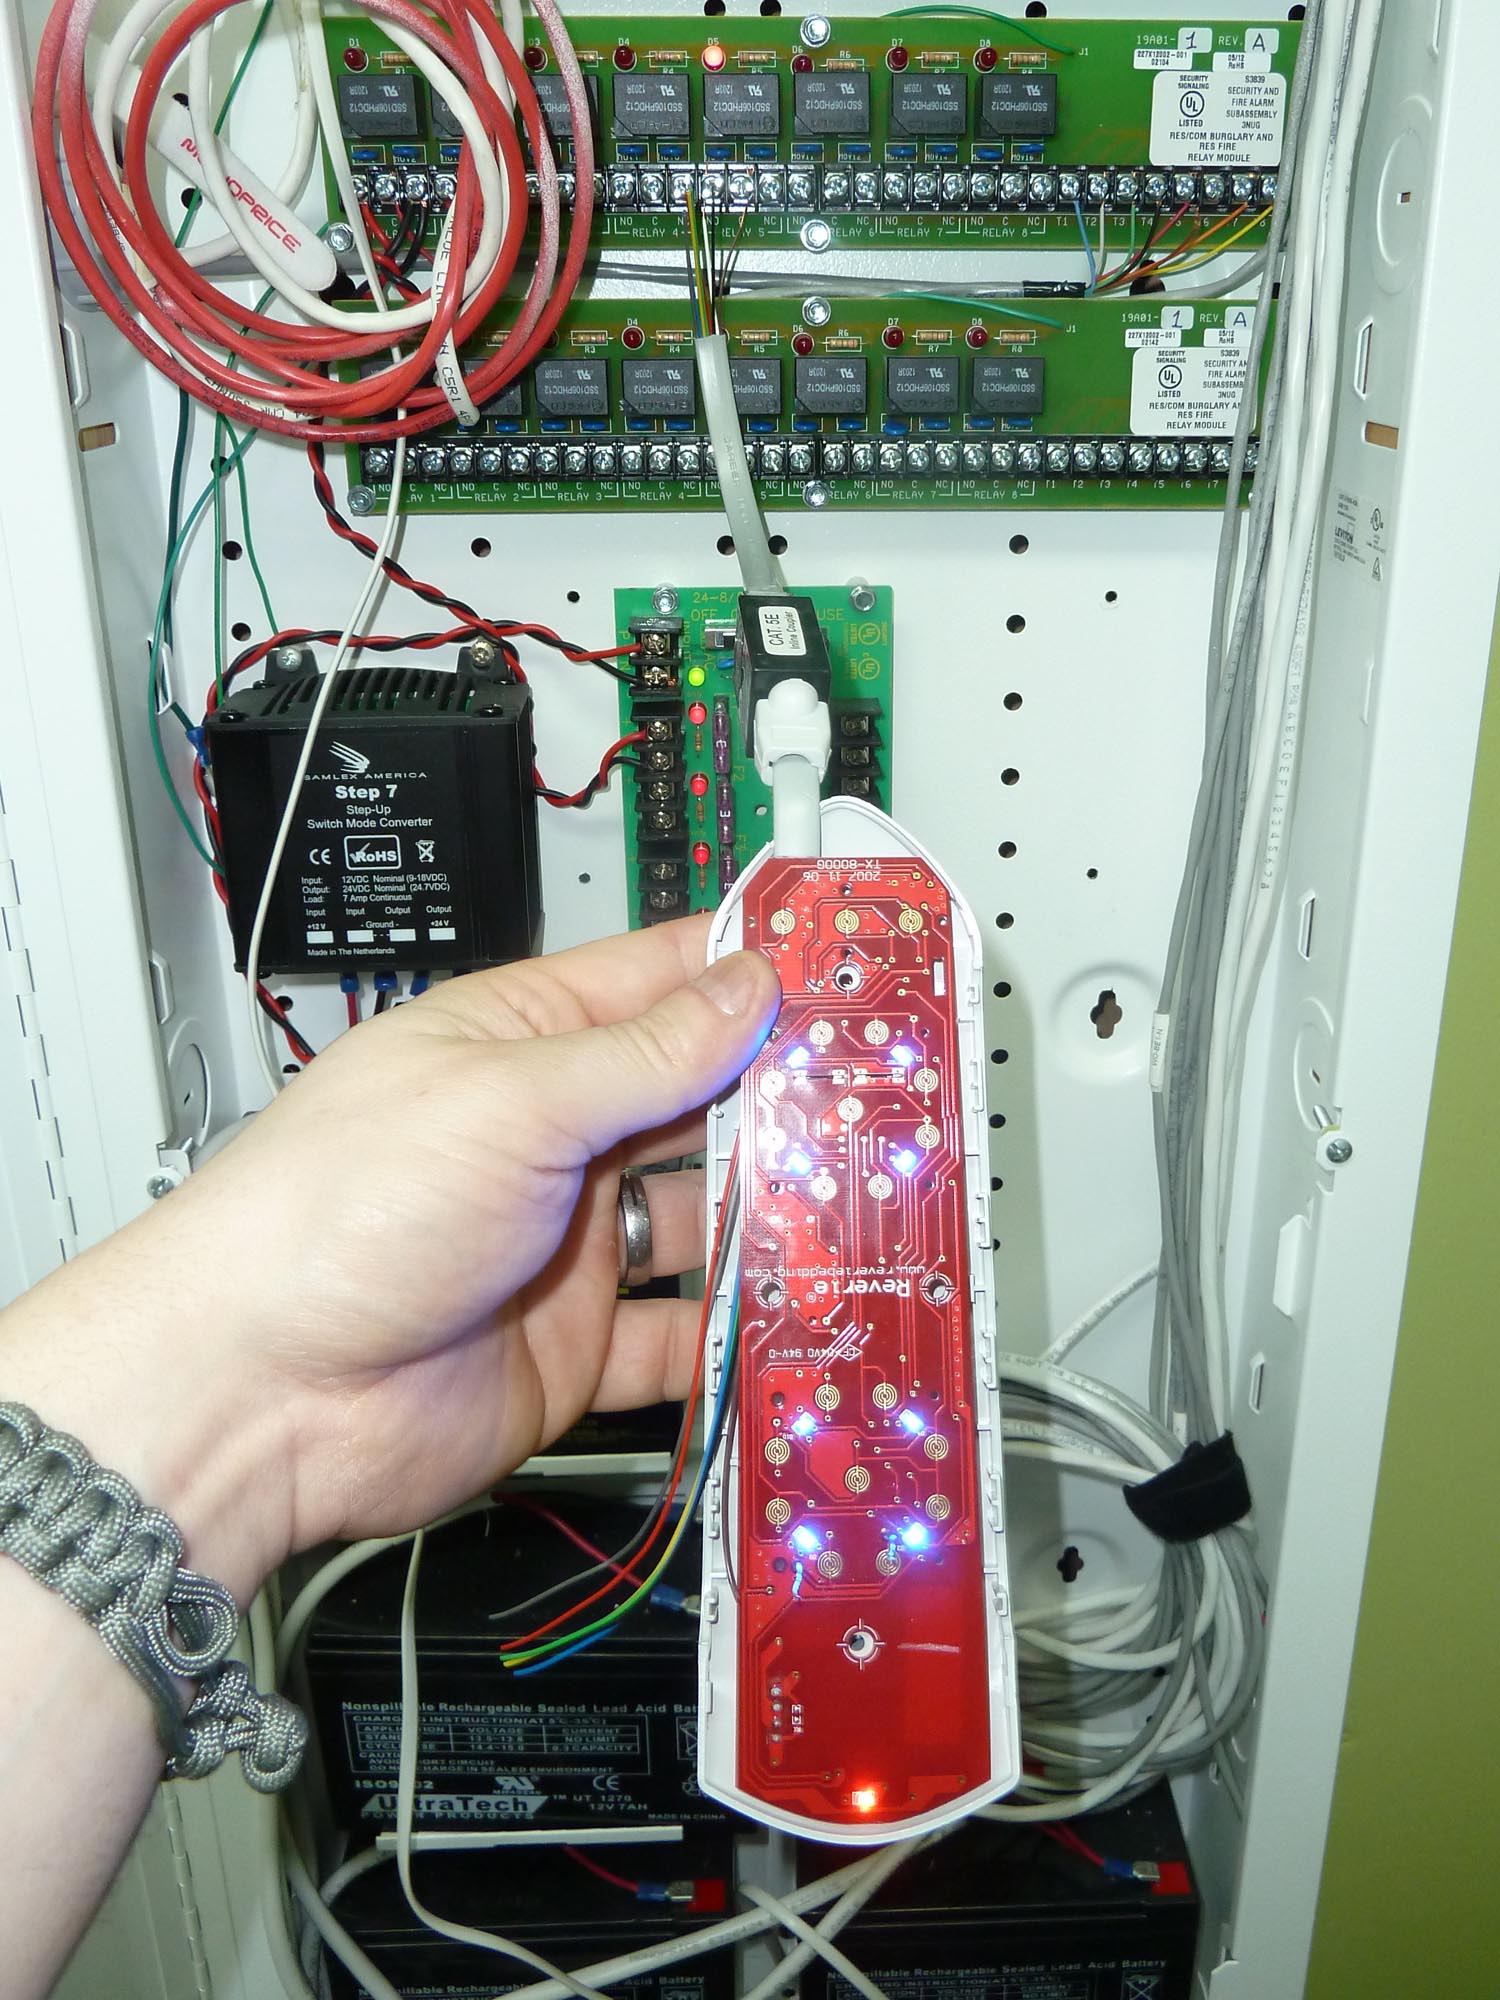
Tempurpedic Ergo Adjustable Bed Automation – Interfacing with my HAI OmniPro II
SO FREAKING AWESOME! Might look like only one button in a hacked remote control, but to me it’s everything… showing that yeah, this most certainly will work, and with a few more hours and a little scripting I’ll easily be able to control my bed with my smart phone and voice. YIPPEE! Probably the first voice automated Tempurpedic bed on earth!
Look forward to the rest of this project when we hopefully finish it up sometime next week!


This is awesome.
Sweet, what type of smart phone and app are you using for the voice control?
No voice control yet, I keep saying I’m going to do it, but so far keep getting distracted on other things. Need to really just hunker down and get the interface figured out! As far as my smart phone, I use an Android app called Superlink
You said it best young Mike, “so freaking awesome”.
Thanks buddy :-)! Glad to see you on here… Most definitely miss those rides through Salt Lake City with the Pedro’s crew!
Hello Mike;
This is Eugene. I am the blacksmith at the PI fair you met yesterday. You remote control hack is very clever… I think the it has application potential for my friend and others like her.
Anyway, tag, you’re it!
Eugene Katsman
I came across this post when looking for a used remote for my beds. I was wondering if you knew how to trick those remotes to a factory reset. Let me explain. I have a split cal king where we plan to use the 2 bases as separate beds but each remote controls both beds. Reverie and temperjerks saynthat model had a problem with reprogamming the remotes. Anyway, their solution is to have me buy a new remote. I pulled the bateries for a week, held buttons down to kill the memory, nothing worked. I have 2 remotes that work fine, just need them on separate frequencies. Any help would be greatly appreciated. Thanks!
Hi Mike, I have just recently discovered your blog, and am busy going through it page by page. I live in central Texas, I’m a 68-year-old woman with muscular dystrophy, a rare adult onset type of MD. As my abilities decrease, I have to look more and more into automation to make independent living possible. I have some very handy friends: a computer geek, a building contractor, and a general handyman.
I am receiving my first service dog on Thursday of this week! She is however, untrained; and I will have to make sure she is properly trained to be of assistance with the numerous things I am no longer able to do for myself. Thank you for making this contribution to the handicapped community!
Thank you for posting this! It inspired me to wire up my own tempurpedic bed to my network!
I purchased a spark photon and a relay controller, which I soldered up to my tempurpedic remote. I then wrote a variety of scripts which let me trigger bed functions via my Amazon Echo (via voice control).
I also use the bed’s vibration feature to wake myself up every single morning, and I even connected IFTTT so that any time I set an alarm on my Amazon Echo, it will do a vibration sequence on my bed.
https://github.com/tomchapin/tempurpedic-remote-relay
Thank you for posting your project!
I’m not sure about your bed, but mine just bought has built in wifi. I stumbled on this post as I was researching my own bed. I’ve poked around a bit and there’s a REST web interface to it. I just need to capture the commands between the phone app and the bed and it should be easy to use software to wirelessly trigger the bed either by voice control or by timer.